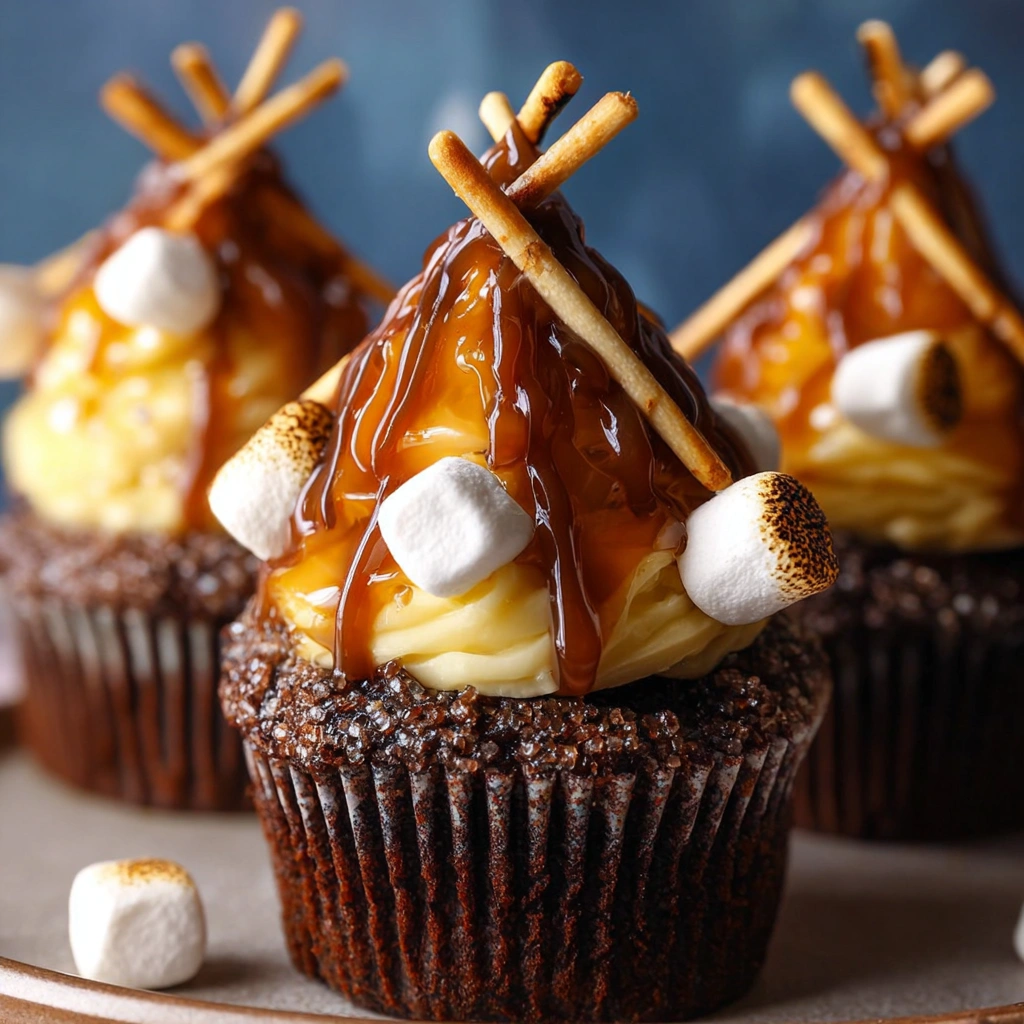
When you think of camping, images of crackling fires, starry nights, and the sweet aroma of dessert wafting through the air come to mind. “Campfire Cupcakes” beautifully encapsulate this idyllic experience, combining the comfort of home-baked goodness with the essence of outdoor adventure. Their rich flavor palette of devil’s food cake seamlessly pairs with the fluffy, vibrantly colored buttercream, bringing warmth and nostalgia to any gathering. With towering pretzel sticks that mimic a blazing campfire and delightful mini marshmallows resting atop, these cupcakes are perfect for birthdays, camping trips, or any occasion where a fireside spirit shines.
What You’ll Need for Campfire Cupcakes
Complete Ingredients List
- 1 box Devil’s food cake mix (plus ingredients called for on the box)
- 1 ½ cups butter, softened
- 6 cups powdered sugar
- 2 tsp. pure vanilla extract
- ¼ cup heavy cream
- Pinch of kosher salt
- Orange and yellow food coloring
- Pretzel sticks (for decoration)
- 48 mini marshmallows
- 24 toothpicks (for decoration)
Ingredient Substitutions & Alternatives
If you have dietary restrictions or simply want to try something different, here are some substitutions and alternatives:
- Gluten-Free Option: Use a gluten-free chocolate cake mix instead of standard devil’s food cake mix.
- Dairy-Free: Opt for plant-based butter and dairy-free heavy cream, and you can find dairy-free chocolate cake mixes as well.
- Reduced Sugar: Replace powdered sugar with a sugar alternative like erythritol or a homemade powdered sugar using coconut sugar.
- Flavor Variations: Instead of a standard chocolate mix, consider using red velvet or any flavored cake mix for a different twist. You could even add instant coffee to your batter to give it a Mocha flavor.
How to Make Campfire Cupcakes
Making Campfire Cupcakes is an engaging experience that balances technique with creativity, allowing you to make something visually stunning and delicious. Here’s a step-by-step guide to help you along the way.
Step 1: Preheat Your Oven
Preheat your oven to 350°F (175°C). This step is crucial for ensuring that your cupcakes rise beautifully and achieve that perfect texture. While the oven heats, line two cupcake pans with cupcake liners. Choose vibrant colors to mimic the fun and festive theme of your campfire cupcakes!
Step 2: Prepare Your Cake Batter
Follow the instructions on the devil’s food cake mix box for preparing the batter. Typically, this involves combining the mix with eggs, water, and oil. Once mixed thoroughly, divide the batter between the prepared cupcake pans. Bake the cupcakes for about 20 minutes, or until a toothpick inserted in the center comes out clean. After they bake, allow the cupcakes to cool completely on a wire rack. This step is essential for applying the frosting later without it melting and sliding off.
Step 3: Create Your Buttercream Frosting
In a large mixing bowl, use a hand mixer or a stand mixer with a paddle attachment to beat the softened butter until it becomes fluffy. This usually takes 3 to 5 minutes. Gradually add the powdered sugar, beating until combined. Next, add the pure vanilla extract, heavy cream, and a pinch of kosher salt. Beat until the mixture is smooth and creamy, ensuring there are no lumps.
Step 4: Color Your Frosting
Dividing the buttercream into two bowls, color one with orange food coloring and the other with yellow. Mix with a spatula until you achieve your desired hue. This step not only gives your cupcakes a vibrant appearance but also mimics the colors of a lively campfire.
Step 5: Pipe the Frosting
To create that eye-catching swirled effect, fill a large piping bag with both colored buttercreams simultaneously by using the “fill and squeeze” method. Now, pipe a generous swirl of frosting onto each cooled cupcake, alternating between orange and yellow to create a fun campfire look.
Step 6: Assemble Your Campfire Decoration
To hearten your Campfire Cupcakes, take pretzel sticks and gently insert them upright into the frosting, simulating logs standing in a campfire. For the flames, take two mini marshmallows and skewer them onto each toothpick. Finally, gently place each toothpick into the frosting, allowing the marshmallows to sit atop your cupcakes. Serve immediately and watch as guests gather around these delightful treats!
Serving Suggestions for Campfire Cupcakes
How to Serve Campfire Cupcakes
These cupcakes can be served at room temperature or slightly chilled for a refreshing twist on a warm day. Present them on a rustic wooden platter adorned with faux campfire logs or surrounded by rocks to emphasize the campfire theme. For added flair, sprinkle edible glitter on top of the frosting for a shimmering effect that resembles flames.
Perfect Pairings & Toppings
You may enjoy your Campfire Cupcakes with a drizzle of chocolate or caramel sauce for a more decadent experience. Serve alongside a scoop of vanilla ice cream or a small serving of whipped cream to turn your treat into a comforting dessert reminiscent of s’mores. Alternatively, coffee or hot cocoa can complement without overpowering the delightful cake.
Storing & Preserving Campfire Cupcakes
Best Storage Methods
For optimal freshness, store your Campfire Cupcakes at room temperature in an airtight container for up to 3 days. If you live in a particularly warm climate, it’s best to keep them in the refrigerator. In this case, they should be consumed within a week.
Reheating or Freezing Tips
If you want to enjoy leftovers later, you can freeze the cupcakes before frosting. Place the cooled cupcakes in a single layer in a freezer-safe container, separating layers with parchment paper. They can be stored this way for up to 2 months. To defrost, place the container in the refrigerator overnight before frosting and enjoying.
Tips for Perfect Campfire Cupcakes Every Time
Avoid These Common Mistakes
- Undermixing or Overmixing the Batter: Pay attention to the mixing time when preparing your cake batter. Overmixing can lead to denser cakes, while undermixing can result in uneven textures.
- Frosting While Warm: Be sure your cupcakes are completely cool before applying frosting; otherwise, it will melt and slide off.
- Ingredient Temperature: Ensure your butter is at room temperature to help achieve that fluffy frosting. Heavy cream should be chilled for the best consistency.
Helpful Tricks for Success
- Piping Techniques: Use a large star tip when piping for a textured look that resembles campfire flames.
- Creating a Fun Event: Make cupcake decorating a group activity where everyone can unleash their creativity with their own cupcake color combinations and arrangements.
- Make the Most of Buttermilk: If you find it hard to get the proper moisture in your cake, try substituting half of the water the mix requires with buttermilk for a richer flavor.
Fun Variations of Campfire Cupcakes
Flavor Variations or Recipe Twists
- Incorporate chopped nuts like walnuts or pecans or even chocolate chips into the batter for added texture.
- Consider adding a hidden surprise, like a marshmallow or a chocolate piece, in the center of the cupcake before baking.
Dietary-Friendly Adjustments
For those following specific diet plans, here are some adjustments:
- Vegan: Substitute eggs for flaxseed meal or applesauce, and use plant-based butter and milk in your frosting.
- Keto-Friendly: Opt for a keto-friendly chocolate cake mix, and use almond flour for frosting essential ingredients for a lower-carb treat.
FAQs
What If My Campfire Cupcakes Doesn’t Turn Out Right?
If your cupcakes are too dry, check your oven to ensure it’s heating correctly. Adding more moisture to your batter can help with density; you can also use a simple syrup brushed onto the cake layers for moisture. If the cupcakes have risen too much and then sunk, be sure not to overmix your batter.
Can I Prepare This in Advance?
Absolutely! You can make the cupcakes and frost them a day before the event. Simply store the unfrosted cupcakes in an airtight container at room temperature. Frost just before serving for the brightest colors and freshest taste!
What Ingredients Can I Swap?
If you can’t find devil’s food cake mix, feel free to use a box of chocolate cake mix instead. As for the frosting, if heavy cream is unavailable, you can substitute it with milk or coconut cream for a lighter texture.
Print
Campfire Cupcakes
- Total Time: 7 hours 25 minutes
- Yield: 10 popsicles 1x
Description
These layered Watermelon Kiwi Popsicles are a refreshing and fun summer treat featuring watermelon, creamy coconut milk, and tart kiwi with a playful touch of mini chocolate chips.
Ingredients
- 19 oz cubed seedless watermelon (about 3 1/2 cups)
- 5 1/2 Tbsp granulated sugar, divided
- 1 Tbsp fresh lemon juice
- 1/2 cup canned coconut milk, well shaken
- 13 oz kiwi (about 6 medium)
- 1 Tbsp mini chocolate chips
Instructions
- Blend Watermelon Layer: Blend watermelon cubes, 2 Tbsp sugar, and lemon juice until smooth. Skim off foam, then pour into popsicle molds, filling 2/3 full. Add mini chocolate chips and insert sticks. Freeze for 3 1/2 hours.
- Make Coconut Layer: Whisk coconut milk with 1 1/2 Tbsp sugar until dissolved. Chill 30 minutes. Pour 1 Tbsp over frozen watermelon layer. Freeze for 45 minutes.
- Blend Kiwi Layer: Peel and chop kiwis. Blend with 2 Tbsp sugar, then strain to remove seeds. Chill 30 minutes. Pour over set coconut layer. Freeze until solid, 2–3 hours.
- Release Popsicles: Run warm water over molds for a few seconds to release popsicles. Serve immediately and enjoy!
Notes
- Use honey or agave instead of sugar for a more natural sweetness.
- Try honeydew or green grapes if watermelon or kiwi aren’t available.
- For vegan or dairy-free, ensure your chocolate chips and coconut milk are compliant.
- Layering ensures visual appeal—make sure each layer is firm before adding the next.
- Prep Time: 25 minutes
- Cook Time: 0 minutes
- Category: Dessert
- Method: No-Bake, Frozen
- Cuisine: American
Nutrition
- Serving Size: 1 popsicle
- Calories: 70
- Sugar: 9g
- Sodium: 10mg
- Fat: 3g
- Saturated Fat: 2g
- Unsaturated Fat: 1g
- Trans Fat: 0g
- Carbohydrates: 10g
- Fiber: 1g
- Protein: 1g
- Cholesterol: 0mg
Keywords: watermelon popsicles, kiwi popsicles, layered popsicles, healthy summer dessert, homemade ice pops