About Fruity Pebbles Cheesecake Tacos
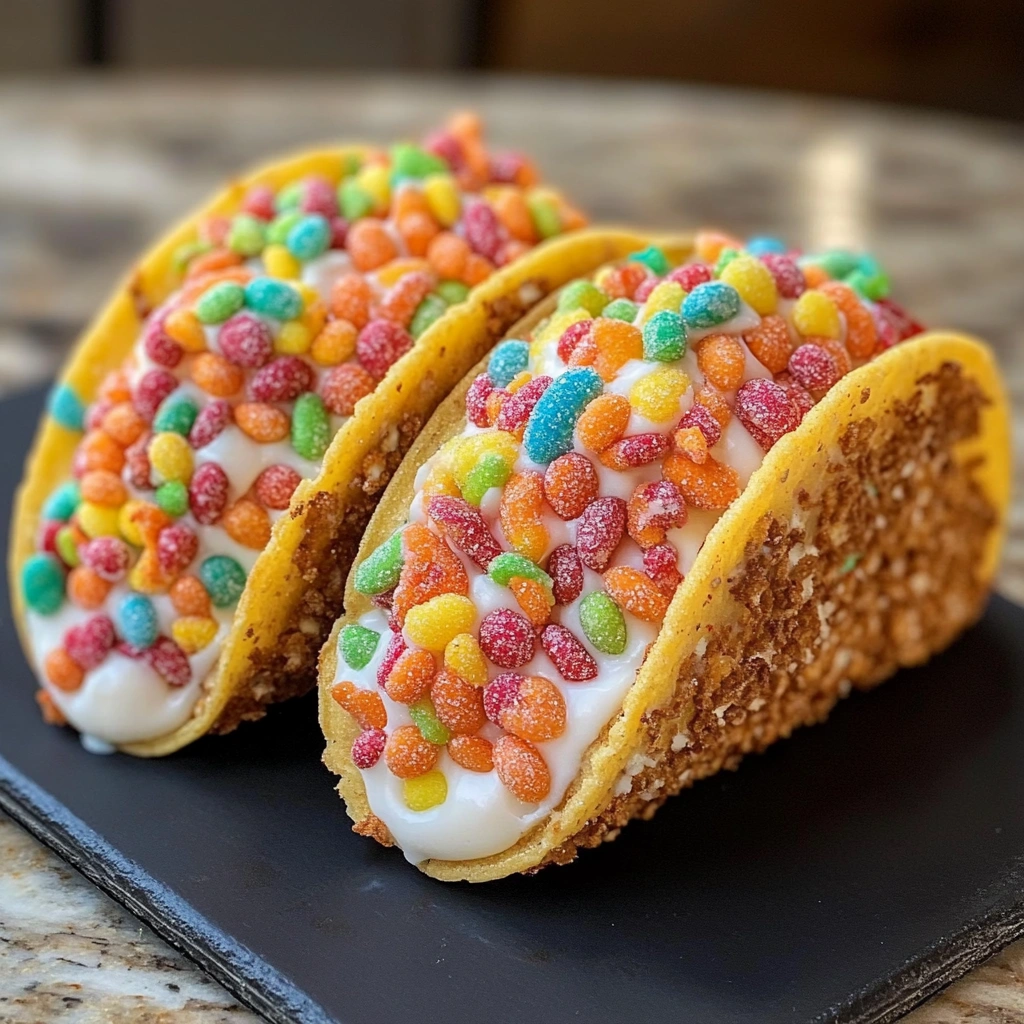
Fruity Pebbles Cheesecake Tacos bring a playful twist to the classic cheesecake dessert, combining the adorable shape of tacos with the delightful taste of cheesecake and the vibrant flavor of Fruity Pebbles cereal. Imagine biting into a crunchy taco shell that is filled with rich and creamy cheesecake flavored with a fruity twist. The colorful sprinkles of Fruity Pebbles add both a visual pop and a burst of fruity taste to each bite, making these tacos the ultimate indulgence for dessert lovers.

What You’ll Need for Fruity Pebbles Cheesecake Tacos
Complete Ingredients List
- Fruity Pebbles Cereal: 2 cups (for crust and topping)
- Cream Cheese: 8 oz, softened
- Powdered Sugar: 1 cup
- Vanilla Extract: 1 tsp
- Sour Cream: ½ cup
- Heavy Whipping Cream: 1 cup
- Taco Shells: 6 mini taco shells
- Butter: ½ cup (for binding the crust)
- Milk: 2 tablespoons (for texture)
- Food Coloring (optional): A few drops (for enhancing color)
Ingredient Substitutions & Alternatives
- Dairy-Free: Use vegan cream cheese and a plant-based sour cream. Substitute heavy whipping cream with coconut cream.
- Gluten-Free: Choose gluten-free taco shells or make your own using almond flour or a suitable gluten-free blend.
- Sugar-Free: Use a sugar substitute in place of powdered sugar, ensuring it is suitable for making cream cheese fillings.
- Flavor Variations: Consider adding lemon zest for a citrus twist or mixing in other cereals alongside Fruity Pebbles for added texture and flavor.
How to Make Fruity Pebbles Cheesecake Tacos
Step 1: Make the Taco Shells
- Preheat your oven to 350°F (175°C).
- In a medium bowl, mix the Fruity Pebbles cereal with melted butter, ensuring that the cereal is well-coated.
- Press the mixture firmly into the molds of mini taco holders or a mini muffin tin, shaping them into taco shell forms. The butter acts as a binding agent.
- Bake in the preheated oven for 10-12 minutes until the shells become golden and crispy. Remove from the oven and let them cool completely.
Step 2: Prepare the Cheesecake Filling
- In a large bowl, combine the softened cream cheese, powdered sugar, and vanilla extract. Use an electric mixer to beat the mixture until smooth and creamy.
- Add the sour cream to the bowl and mix until well incorporated.
- In a separate bowl, whip the heavy whipping cream until stiff peaks form. Gently fold the whipped cream into the cream cheese mixture. This creates a light and airy filling.
Step 3: Assemble the Tacos
- Once the taco shells have completely cooled, carefully fill each shell with the cheesecake mixture using a piping bag for a clean and professional look.
- If desired, add a few drops of food coloring to the filling for added vibrancy before piping.
Step 4: Finish and Serve
- Top each filled taco with extra Fruity Pebbles cereal for texture and visual appeal.
- Refrigerate the assembled tacos for at least an hour before serving to allow the cheesecake filling to set.
Serving Suggestions for Fruity Pebbles Cheesecake Tacos
How to Serve Fruity Pebbles Cheesecake Tacos
These delightful treats are best served chilled. The cool temperatures enhance the creamy texture of the cheesecake filling and provide a refreshing contrast against the crunchy taco shell. When ready to serve, plate the tacos on a decorative platter, arranging them in a playful manner to showcase their vibrant colors. For an eye-catching presentation, consider garnishing the plate with extra Fruity Pebbles and a drizzle of chocolate sauce or fruit puree.
Perfect Pairings & Toppings
To enhance the flavor experience, consider serving these fruity tacos alongside a scoop of vanilla or strawberry ice cream for added creaminess and contrast. A sprinkle of crushed nuts or a dusting of edible glitter can provide a festive flair. Alternatively, offer sauces such as chocolate syrup, caramel, or whipped cream on the side for guests to customize their dessert.
Storing & Preserving Fruity Pebbles Cheesecake Tacos
Best Storage Methods
Fruity Pebbles Cheesecake Tacos can be stored in an airtight container in the refrigerator for up to three days. However, it’s best to store the taco shells separately from the filling to maintain their crunch.
Reheating or Freezing Tips
While it’s not advisable to freeze the filled tacos due to the cream cheese filling, you can prepare the shells in advance and keep them in an airtight container at room temperature for a week. If you wish to freeze the filling, plan to make fresh taco shells when you are ready to serve them. Simply thaw the filling in the refrigerator overnight before assembling.
Tips for Perfect Fruity Pebbles Cheesecake Tacos Every Time
Avoid These Common Mistakes
- Over-mixing the Filling: This can cause the whipped cream to deflate, leading to a heavy filling with less airy texture.
- Skipping the Chill Time: Allowing the tacos to set in the refrigerator helps solidify the filling and improves the flavors.
- Too Warm Shells: Filling warm taco shells can lead to a soggy texture. Always ensure they are completely cool.
Helpful Tricks for Success
- Use a piping bag fitted with a large round tip for easy filling. It ensures a neat presentation and prevents mess.
- Consider chilling your mixing bowl and whisk attachment before whipping the cream to achieve fluffier results.
- Feel free to play around with food colors to match themes for parties, like using pastel colors for spring occasions or vibrant hues for birthday celebrations.
Fun Variations of Fruity Pebbles Cheesecake Tacos
Flavor Variations or Recipe Twists
Elevate your Fruity Pebbles Cheesecake Tacos by incorporating different flavors and textures. For an added crunch, mix in crushed nuts or add a layer of fresh fruit like strawberries or blueberries inside the cheesecakes. If you’re a chocolate lover, try drizzling melted chocolate over the top before serving.
Dietary-Friendly Adjustments
Make these tacos suitable for various diets:
- Vegan: Replace all dairy products with plant-based alternatives such as almond or coconut yogurt, non-dairy cream cheese, and crushed nuts for a crunchy shell.
- Keto: Use a keto-friendly sweetener in place of powdered sugar and opt for low-carb tortillas or ground nuts to create a suitable crust.
FAQs
What If My Fruity Pebbles Cheesecake Tacos Doesn’t Turn Out Right?
If your filling turns out too runny, it may indicate that the cream cheese wasn’t softened enough, or you overmixed the whipped cream. Remember to fold the whipped cream gently into the filling to maintain the light texture. If the taco shells become soggy, it often happens from using warm shells or overfilling. Next time, ensure the shells are completely cool before filling.
Can I Prepare This in Advance?
Absolutely! You can prepare the taco shells and the cheesecake filling a day ahead. Store the taco shells at room temperature and the filling in the fridge. Just fill the shells before serving for the best texture and freshness.
What Ingredients Can I Swap?
If you’re unable to find mini taco shells, try making your own using a simple dough of flour and butter. For allergies, coconut cream can replace heavy whipping cream, and agave syrup can be an alternative for powdered sugar. Always look for suitable substitutes that cater to dietary restrictions and flavor preferences.
In conclusion, Fruity Pebbles Cheesecake Tacos are a fun, delicious delight that combines creaminess and crunch, making them an excellent choice for any event or gathering. With their playful presentation and versatile nature, there’s so much room for creativity and customization in this dessert, ensuring it will be a hit among friends and family alike!
Print
Fruity Pebbles Cheesecake Tacos
- Total Time: 1 hour 40 minutes (including chilling)
- Yield: 6 mini tacos 1x
- Diet: Vegetarian
Description
Fruity Pebbles Cheesecake Tacos are a colorful and playful dessert that combines the creamy richness of cheesecake with the crunch and fruity flavor of cereal-based taco shells. A perfect treat for kids and adults alike, these vibrant tacos make any occasion extra fun and sweet.
Ingredients
- 2 cups Fruity Pebbles Cereal (for crust and topping)
- 8 oz cream cheese, softened
- 1 cup powdered sugar
- 1 tsp vanilla extract
- ½ cup sour cream
- 1 cup heavy whipping cream
- 6 mini taco shells
- ½ cup butter (for binding the crust)
- 2 tbsp milk (for texture)
- Food coloring (optional, a few drops for color)
Instructions
- Preheat oven to 350°F (175°C).
- In a medium bowl, mix Fruity Pebbles cereal with melted butter until well-coated.
- Press the mixture into mini taco molds or a mini muffin tin to form taco shells.
- Bake for 10-12 minutes until golden and crispy. Let cool completely.
- In a large bowl, beat cream cheese, powdered sugar, and vanilla extract until smooth and creamy.
- Add sour cream and mix until incorporated.
- In a separate bowl, whip heavy cream until stiff peaks form. Gently fold it into the cream cheese mixture.
- Add food coloring if desired.
- Pipe the cheesecake filling into the cooled taco shells.
- Top with extra Fruity Pebbles cereal for texture and decoration.
- Refrigerate for at least 1 hour before serving.
Notes
- Use vegan alternatives for a dairy-free version.
- Gluten-free taco shells can be used for dietary needs.
- Chill before serving to ensure the filling sets properly.
- Add lemon zest for a citrus twist if desired.
- Prep Time: 25 minutes
- Cook Time: 12 minutes
- Category: Dessert
- Method: No-Bake with Baked Shells
- Cuisine: American
Nutrition
- Serving Size: 1 taco
- Calories: 310
- Sugar: 28g
- Sodium: 120mg
- Fat: 20g
- Saturated Fat: 12g
- Unsaturated Fat: 6g
- Trans Fat: 0g
- Carbohydrates: 30g
- Fiber: 0g
- Protein: 3g
- Cholesterol: 55mg
Keywords: Fruity Pebbles, Cheesecake Tacos, Fun Desserts, Cereal Dessert, Mini Cheesecake