When the days grow long and warm, there’s nothing quite as delightful as a cold, creamy treat to help you cool off and enjoy the sunshine. Enter Homemade Creamsicles—the vibrant, flavorful frozen dessert that brings memories of childhood summers rushing back. With their luscious orange flavor and creamy texture, these creamsicles are not just a nostalgic treat; they embody the perfect balance of sweet and tangy, making them an ideal indulgence for any occasion. Whether you’re hosting a summer gathering, enjoying a quiet afternoon in the shade, or simply looking for a quick and satisfying dessert, Homemade Creamsicles are sure to please everyone around.

What You’ll Need for Homemade Creamsicles
To embark on your homemade creamsicle journey, gather the following ingredients. The beauty of these creamsicles lies in their simplicity and accessibility.
Complete Ingredients List
- 12 oz. frozen orange juice concentrate
- 1/2 cup heavy cream
- 1/4 cup granulated sugar
- 1/2 tsp. pure vanilla extract
- 1/8 tsp. kosher salt
- Orange food coloring (optional)
- 1 cup full-fat plain yogurt
- 1 cup heavy cream
- 1/4 cup granulated sugar
- 1 tsp. pure vanilla extract
- 1/8 tsp. kosher salt
Ingredient Substitutions & Alternatives
Don’t have everything on hand? Fret not! Here are some substitutions to ensure that everyone can enjoy these creamsicles:
- Dairy-Free Alternative: Use coconut cream or almond milk in place of heavy cream, and opt for dairy-free yogurt.
- Sugar Substitution: Substitute granulated sugar with honey, agave syrup, or a sugar alternative like stevia for a lower-calorie option.
- Flavor Variations: For a tropical twist, incorporate pineapple or mango juice instead of orange, or add a dash of almond extract for a unique flavor profile.
These alternatives not only accommodate different dietary preferences but also open the door to exciting flavor variations!
How to Make Homemade Creamsicles
Getting those layers of creamy and fruity goodness into your molds is easy and enjoyable. Follow these detailed steps to create your own delicious Homemade Creamsicles!
Step 1: Prepare the Orange Base
In a blender, combine 12 oz. frozen orange juice concentrate, 1/2 cup heavy cream, 1/4 cup granulated sugar, 1/2 tsp. pure vanilla extract, and 1/8 tsp. kosher salt. Blend on medium-low speed until all the ingredients are well combined. This mixture should be smooth and creamy, with a delectable orange flavor. If you’d like to enhance the color, add a few drops of orange food coloring and blend again until you achieve your desired hue. Once done, transfer the mixture to a bowl, cover it with plastic wrap, and refrigerate. This chilling process allows the flavors to meld beautifully.
Step 2: Prepare the Creamy Yogurt Base
In a separate bowl, whisk together 1 cup full-fat plain yogurt, 1 cup heavy cream, 1/4 cup granulated sugar, 1 tsp. pure vanilla extract, and 1/8 tsp. kosher salt until the mixture is uniform and creamy. The yogurt adds a tangy richness that perfectly complements the sweetness of the orange base. After whisking, cover and refrigerate this mixture, allowing the flavors to develop.
Step 3: Layer the Mixtures
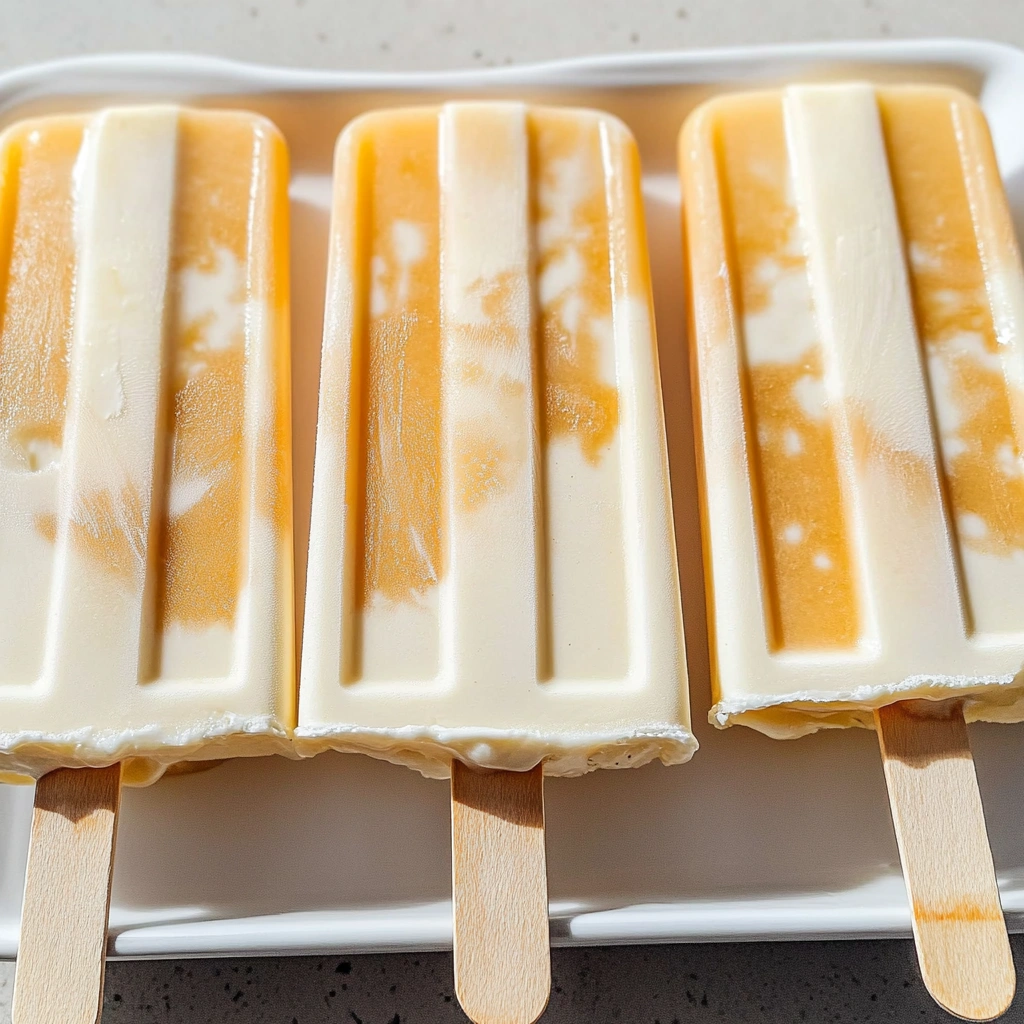
Once both mixtures are thoroughly chilled (approximately 30 minutes), it’s time to assemble your creamsicles. Take your ice pop mold and pour 1 tablespoon of the creamy yogurt base into each mold, creating the first layer. Follow this with 1 tablespoon of the orange base, layering the flavors to give that visually striking two-tone appearance. Repeat this layering process until each mold is filled, leaving a little space at the top for expansion during freezing.
Step 4: Freeze and Enjoy
After the molds are filled, cover them with their lids and insert sticks. Place the molds in the freezer and let them freeze completely, which will take at least 8 hours or overnight for the best results. Once frozen, release the creamsicles by dipping the molds briefly into warm water for easy removal. Finally, enjoy your Homemade Creamsicles as a perfect summer treat!
Serving Suggestions for Homemade Creamsicles
How to Serve Homemade Creamsicles
When serving your Homemade Creamsicles, it’s best to enjoy them straight from the freezer for that refreshing cold temperature. If they are too frozen to pull out of the mold easily, simply dip the bottom of the mold into warm water for a few seconds until they release.
Presentation is key—arrange the popsicles on a vibrant platter or incorporate them into a festive display. You could even garnish with fresh mint leaves for a touch of elegance.
Perfect Pairings & Toppings
While these creamsicles are delightful on their own, consider adding a few complementary toppings or sides to elevate your dessert:
- Chocolate Drizzle: Dip the pops into melted dark chocolate and allow it to harden for a delicious contrast.
- Fresh Fruit: Accompany the creamsicles with a side of fresh berries for a refreshing and colorful touch.
- Nuts: Add crushed nuts for an extra crunch, offering a delightful texture against the creamy pops.
These simple additions can turn your simple creamsicle into a gourmet dessert.
Storing & Preserving Homemade Creamsicles
Best Storage Methods
For maximum freshness, store your Homemade Creamsicles in the freezer, ideally in their molds or wrapped in plastic wrap. They can last for up to 2-3 months in the freezer without losing their flavor or texture. When stored properly, they remain a delightful treat for those warm days.
Reheating or Freezing Tips
Since these are frozen treats, there’s no need to reheat them. However, if you find they have become too hard after a long time in the freezer, you can let them sit at room temperature for a few minutes to soften slightly before serving. This will help retain their creamy texture.
Tips for Perfect Homemade Creamsicles Every Time
Avoid These Common Mistakes
When making Homemade Creamsicles, there are a few common pitfalls to avoid:
- Over-blending: Be careful not to over-blend the mixtures, as this could incorporate too much air, affecting the texture.
- Inaccurate Measurements: Always use precise measurements for the ingredients, especially the sugar, to ensure the correct sweetness and texture.
- Insufficient Freezing Time: Avoid pulling them out of the freezer too early. Make sure they are fully set for the best experience.
Helpful Tricks for Success
Here are some pro tips to ensure your creamsicles turn out perfectly:
- Use Fresh Ingredients: For the best flavor, opt for fresh orange juice if available, although frozen concentrate works just fine too.
- Experiment with Layers: Consider using different flavored yogurts or juices to create eye-catching layers and unique flavors.
- Make Ahead: Feel free to make batches ahead of time for parties or special occasions, ensuring everyone has a refreshing treat!
Fun Variations of Homemade Creamsicles
Flavor Variations or Recipe Twists
Get creative with your Homemade Creamsicles! Here are some fun variations to inspire you:
- Berry Bliss: Incorporate pureed strawberries or raspberries into the creamy layer for a fruity strawberry creamsicle.
- Coconut Cream: Substitute coconut milk for the yogurt in the creamy layer for a tropical spin on the classic.
- Chocolate Orange: Swirl in some melted chocolate into the orange base for a delightful chocolate-orange flavor.
With these variations, you can customize your creamsicles to suit every palate!
Dietary-Friendly Adjustments
If you are looking to make this recipe more accommodating for dietary restrictions, consider these adjustments:
- Vegan Option: Replace dairy with coconut yogurt or cashew cream, and use a plant-based sweetener.
- Sugar-Free: Use erythritol or monk fruit sweetener in place of sugar for a sugar-free treat.
- Keto-Friendly: Choose low-carb, high-fat yogurt and sweetener to keep them in line with keto diets.
Creating fun, delicious ice pops has never been easier, giving everyone a chance to indulge.
FAQs
What If My Homemade Creamsicles Don’t Turn Out Right?
If your creamsicles turn out too icy or hard, it may be due to excess air being incorporated during blending or not enough sugar noted for the sweetness. To troubleshoot:
- Too Hard: Let them sit out of the freezer for a few minutes before attempting to remove them from the molds.
- Not Setting: Ensure that the mixtures were cold enough before being poured into molds, or check your freezer’s temperature setting.
Can I Prepare This in Advance?
Absolutely! Homemade Creamsicles can be made up to 2-3 months in advance. Just follow the recipe instructions and store them in the freezer. Before serving, you can allow them to sit at room temperature for a minute or two if needed.
What Ingredients Can I Swap?
There are numerous alternatives you can utilize if certain ingredients pose a challenge. For example, swapping out heavy cream for coconut milk is excellent for a dairy-free version. You can also use other juice concentrates, such as grape or apple juice, to create a different flavor profile. The beauty of this recipe lies in its versatility!
With these guidelines, tips, and variations, you are well on your way to mastering the art of Homemade Creamsicles! Enjoy the process, share the love, and relish every frosty bite!
Print
Homemade Creamsicles
Description
Homemade Creamsicles are a nostalgic frozen treat that perfectly blends the tangy brightness of orange juice with creamy yogurt and vanilla, making them the ideal refreshing dessert for summer days.
Ingredients
- 12 oz. frozen orange juice concentrate
- 1/2 cup heavy cream
- 1/4 cup granulated sugar
- 1/2 tsp. pure vanilla extract
- 1/8 tsp. kosher salt
- Orange food coloring (optional)
- 1 cup full-fat plain yogurt
- 1 cup heavy cream
- 1/4 cup granulated sugar
- 1 tsp. pure vanilla extract
- 1/8 tsp. kosher salt
Instructions
- In a blender, combine orange juice concentrate, 1/2 cup heavy cream, 1/4 cup sugar, 1/2 tsp vanilla extract, and 1/8 tsp salt. Blend until smooth. Add orange food coloring if desired. Refrigerate the mixture.
- In a separate bowl, whisk together yogurt, 1 cup heavy cream, 1/4 cup sugar, 1 tsp vanilla extract, and 1/8 tsp salt. Refrigerate to chill.
- Once chilled, layer 1 tablespoon of yogurt mixture followed by 1 tablespoon of orange mixture into ice pop molds. Repeat the layers until molds are filled, leaving space at the top.
- Insert sticks and freeze for at least 8 hours or overnight. To release, dip molds briefly in warm water. Enjoy!
Notes
- Use coconut cream and dairy-free yogurt for a dairy-free version.
- Replace sugar with honey, agave, or stevia for a low-sugar option.
- Try other juices like pineapple or mango for a flavor variation.
- Layering gives a beautiful two-tone appearance—great for presentation.
- Freeze overnight for best texture and flavor development.
- Category: Dessert, Snack
Nutrition
- Serving Size: 1 creamsicle
- Calories: 160
- Sugar: 17g
- Sodium: 60mg
- Fat: 9g
- Saturated Fat: 5g
- Unsaturated Fat: 3g
- Trans Fat: 0g
- Carbohydrates: 18g
- Fiber: 0g
- Protein: 2g
- Cholesterol: 30mg