Milk and Cookies Icebox Cake is an indulgent dessert that beautifully marries the comforting flavors of chocolate chip cookies with creamy, whipped filling. The cake boasts a delightful combination of textures – the soft, melt-in-your-mouth cream paired with the crisp bite of cookies creates a heavenly experience for anyone who takes a bite. This recipe triumphantly resonates with childhood nostalgia, invoking images of cozy afternoons spent dunking cookies into milk. It’s a dessert that doesn’t have a specific cultural background but rather transcends borders by capturing the universally cherished affection for milk and cookies.

What You’ll Need for Milk and Cookies Icebox Cake
Complete Ingredients List
- 2 (13-oz.) boxes store-bought chocolate chip cookies
- 3 cups heavy cream
- 1 (8 oz) block cream cheese, softened
- 2 Tbsp. powdered sugar
Ingredient Substitutions & Alternatives
Should you have dietary restrictions or ingredients on hand that you’d like to substitute, here are a few alternatives:
- Dairy-Free: Swap heavy cream with coconut cream and use dairy-free cream cheese.
- Gluten-Free: Replace chocolate chip cookies with gluten-free varieties.
- Lower Sugar: Utilize a sugar substitute for the powdered sugar for a healthier twist.
- Flavor Variations: Consider using peanut butter cookies or oatmeal cookies to switch up the flavor profile.
How to Make Milk and Cookies Icebox Cake
Creating this delightful dessert may seem like a daunting task, but each step is straightforward, leading to a delicious outcome that looks stunning on any dessert table.
Step 1: Crushing the Cookies
In a large resealable bag, crush 15 chocolate chip cookies using a rolling pin. This step is not only meditative but fundamentally important as it sets the stage for the flavor infusion that’s to come. Once crushed, transfer the majority of the cookie crumbs into a large liquid measuring cup, saving a handful for decoration later. Then, pour in the heavy cream and allow this mixture to sit for about 10 minutes. This infusion is crucial as it imparts the chocolate chip cookie flavor into the cream.
Step 2: Straining the Cream
After letting the cookie-cream mixture rest, it’s time to strain it. Use a fine-mesh strainer to pour the heavy cream into a large bowl, discarding the crushed cookies. What you are left with is cookie-infused cream, rich and full of flavor, ready to be transformed into a luscious whipped mixture.
Step 3: Whipping the Cream Cheese
In another large bowl, add the softened cream cheese. Using a handheld electric mixer, beat the cream cheese until it turns fluffy, taking about one minute. Next, add the powdered sugar and continue mixing until smooth and fully incorporated. Finally, add the previously strained cookie-infused cream and keep mixing until soft peaks form. This fluffy mixture will become the filling of your icebox cake.
Step 4: Building the Cake
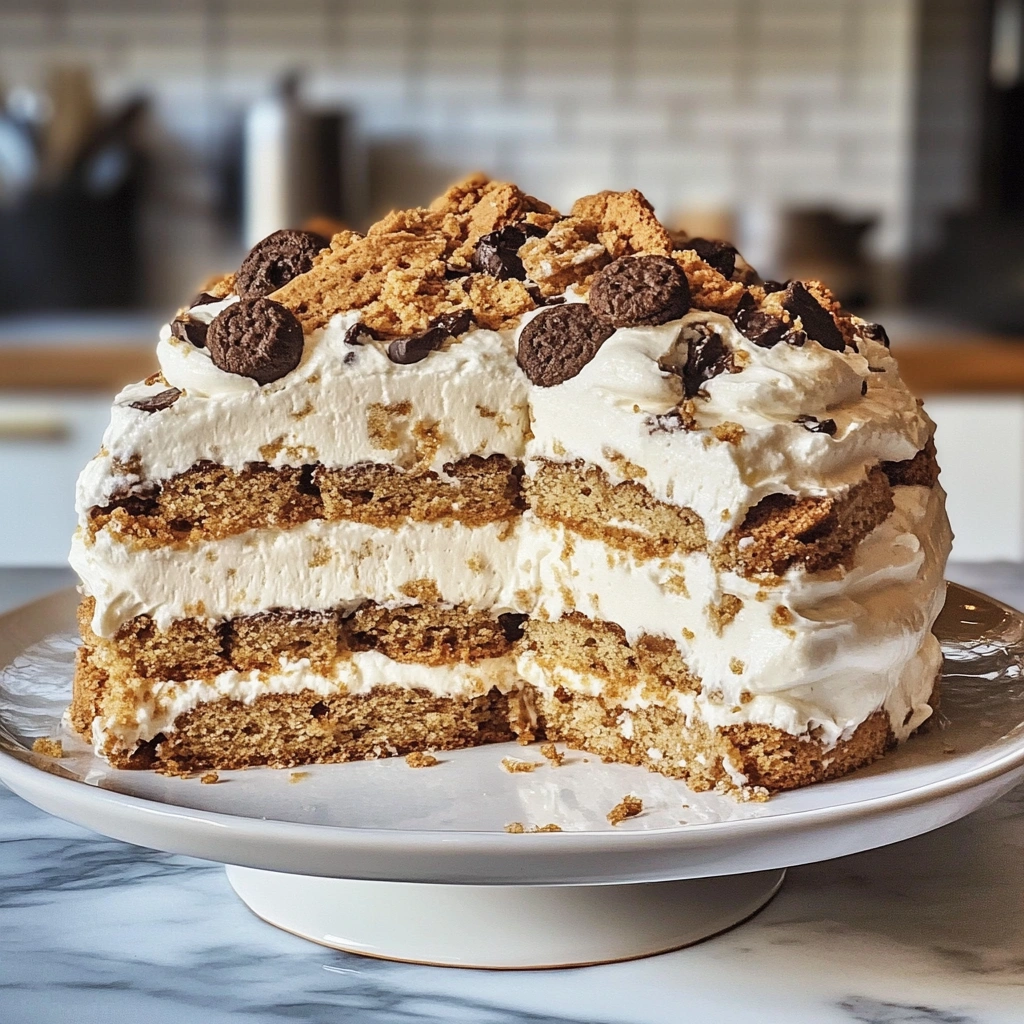
Now, it’s assembly time! On a cake plate, spread a thin layer of the whipped cream mixture at the bottom. Next, arrange eight cookies side by side in a circle, layering three more cookies in the center. Spread another layer of whipped cream on top of the cookies, followed by another layer of cookies, carefully alternating so that the cookies do not sit directly on top of each other. Repeat this process until you have built six layers, finishing with a layer of whipped cream on top. To complete your masterpiece, sprinkle with the reserved crushed cookies. Cover the assembled cake loosely with plastic wrap and transfer it to the refrigerator to chill for approximately six hours, allowing all the flavors to meld and the cake to soften into creamy perfection.
Serving Suggestions for Milk and Cookies Icebox Cake
How to Serve Milk and Cookies Icebox Cake
This icebox cake shines brightest when served chilled. Once it’s ready to be enjoyed, slice it into wedges and plate it with care. A warm ambiance can be created by presenting it on a colorful, decorative platter, or you can keep it simple with a plain white dish to emphasize the cake’s colors. A crispy layer of cookies peeking through the layers of cream is not only eye-catching but also adds to the anticipation of indulgence.
Perfect Pairings & Toppings
The Milk and Cookies Icebox Cake pairs beautifully with a glass of cold milk, a nod to its namesake. For an elevated experience, consider serving it with caramel or chocolate sauce drizzled on top or alongside a scoop of vanilla ice cream. Fresh berries can also provide a refreshing contrast to the sweetness, adding a pop of color and flavor.
Storing & Preserving Milk and Cookies Icebox Cake
Best Storage Methods
Storing your Milk and Cookies Icebox Cake properly ensures that it maintains its delightful texture and flavor. The best place to keep it is in the refrigerator, where it can be kept for up to 3-4 days. Make sure it is well-covered, preferably with plastic wrap or an airtight container.
Reheating or Freezing Tips
If you wish to freeze your cake for longer storage, slice it into individual portions, wrap each slice in plastic wrap, and then place them in an airtight container. You can store the individual slices in the freezer for up to one month. When ready to enjoy, simply remove a piece and let it thaw in the refrigerator for several hours. Avoid microwaving, as it can compromise the texture and creamy qualities of the cake.
Tips for Perfect Milk and Cookies Icebox Cake Every Time
Avoid These Common Mistakes
One common error is not allowing the cream to properly infuse, leading to a lack of flavor depth in the cake. Make sure to allow the cookie crumbs to sit in the heavy cream adequately. Additionally, overmixing the whipped cream mixture can result in a grainy texture rather than the desired fluffiness.
Helpful Tricks for Success
To ensure your icebox cake comes out perfectly, use room temperature cream cheese when whipping; it’s easier to achieve that smooth consistency. If you want to speed up the chilling process, consider freezing the assembled cake for the first hour before moving it to the refrigerator. Lastly, using a serrated knife to slice the cake creates cleaner cuts, making it visually appealing.
Fun Variations of Milk and Cookies Icebox Cake
Flavor Variations or Recipe Twists
The beauty of the Milk and Cookies Icebox Cake lies in its versatility. Consider adding sprinkles to the whipped cream layer to give it a festive touch, or fold in mini chocolate chips or crushed nuts for added texture. You might also experiment with flavored cookies such as double chocolate, peanut butter, or even snickerdoodles for a surprising twist.
Dietary-Friendly Adjustments
To adapt this recipe for different dietary needs, utilizing coconut whipped cream and dairy-free cream cheese provides a vegan alternative. Instead of heavy cream, you can use avocados blended until smooth, mixed with cocoa powder for a chocolatey flavor that’s also healthy. Adjusting the sugar can create a keto-friendly dessert, simply replace sugar with your preferred sugar substitute.
FAQs
What If My Milk and Cookies Icebox Cake Doesn’t Turn Out Right?
In the event that your icebox cake doesn’t seem to set properly, it might be due to inadequate chill time or not enough whipped cream. This cake needs ample time in the refrigerator to meld and soften the cookies properly. If it seems too dry, ensure you’re incorporating enough whipped cream in the layering process.
Can I Prepare This in Advance?
Absolutely! In fact, preparing your Milk and Cookies Icebox Cake a day ahead enhances the flavor as the layers have more time to meld together. Just be sure to keep it covered in the refrigerator to prevent it from drying out or absorbing any unwanted smells.
What Ingredients Can I Swap?
Should you find yourself missing an ingredient, there are many alternatives available. For instance, instead of store-bought cookies, you can use homemade chocolate chip cookies or even switch it up with different types of cookies like Oreos or shortbreads. If you are out of powdered sugar, granulated sugar can also be used in a pinch; just ensure you mix it longer to dissolve completely.
Print
Milk and Cookies Icebox Cake
- Total Time: 6 hours 20 minutes
- Yield: 10 servings 1x
- Diet: Vegetarian
Description
Milk and Cookies Icebox Cake is an easy no-bake dessert that layers store-bought chocolate chip cookies with a luscious, cookie-infused cream cheese whipped filling. Perfect for summer or when you need a crowd-pleasing treat without turning on the oven.
Ingredients
- 2 (13-oz.) boxes store-bought chocolate chip cookies
- 3 cups heavy cream
- 1 (8 oz) block cream cheese, softened
- 2 tablespoons powdered sugar
Instructions
- Crush Cookies: Place 15 cookies in a resealable bag and crush with a rolling pin. Reserve a handful of crumbs for decoration and place the rest in a large liquid measuring cup.
- Infuse Cream: Pour the heavy cream over the crushed cookies and let sit for 10 minutes to absorb the flavor.
- Strain Cream: Using a fine-mesh strainer, pour the cream into a large bowl, discarding the soaked cookies. Set the cookie-infused cream aside.
- Whip Filling: In a separate bowl, beat softened cream cheese until fluffy (about 1 minute). Add powdered sugar and mix until smooth. Gradually add the strained cream and whip until soft peaks form.
- Assemble Cake: On a serving plate, spread a thin layer of whipped cream mixture. Layer 8 cookies in a circle with 3 in the center. Spread more whipped cream over cookies. Continue layering, alternating placement, until 6 layers are formed. Finish with a layer of whipped cream.
- Chill: Sprinkle reserved crushed cookies on top. Cover loosely with plastic wrap and refrigerate for at least 6 hours to set.
Notes
- Dairy-Free: Use coconut cream and dairy-free cream cheese.
- Gluten-Free: Substitute with gluten-free chocolate chip cookies.
- Lower Sugar: Use a sugar substitute like erythritol in place of powdered sugar.
- Flavor Twist: Try peanut butter or oatmeal cookies for variety.
- Prep Time: 20 minutes
- Cook Time: undefined
- Category: Dessert
- Method: No-Bake
- Cuisine: American
Nutrition
- Serving Size: 1 slice
- Calories: 430
- Sugar: 20g
- Sodium: 220mg
- Fat: 30g
- Saturated Fat: 18g
- Unsaturated Fat: 10g
- Trans Fat: 0g
- Carbohydrates: 35g
- Fiber: 1g
- Protein: 4g
- Cholesterol: 70mg
Keywords: icebox cake, no bake dessert, chocolate chip cookie cake, summer dessert, easy layered dessert