

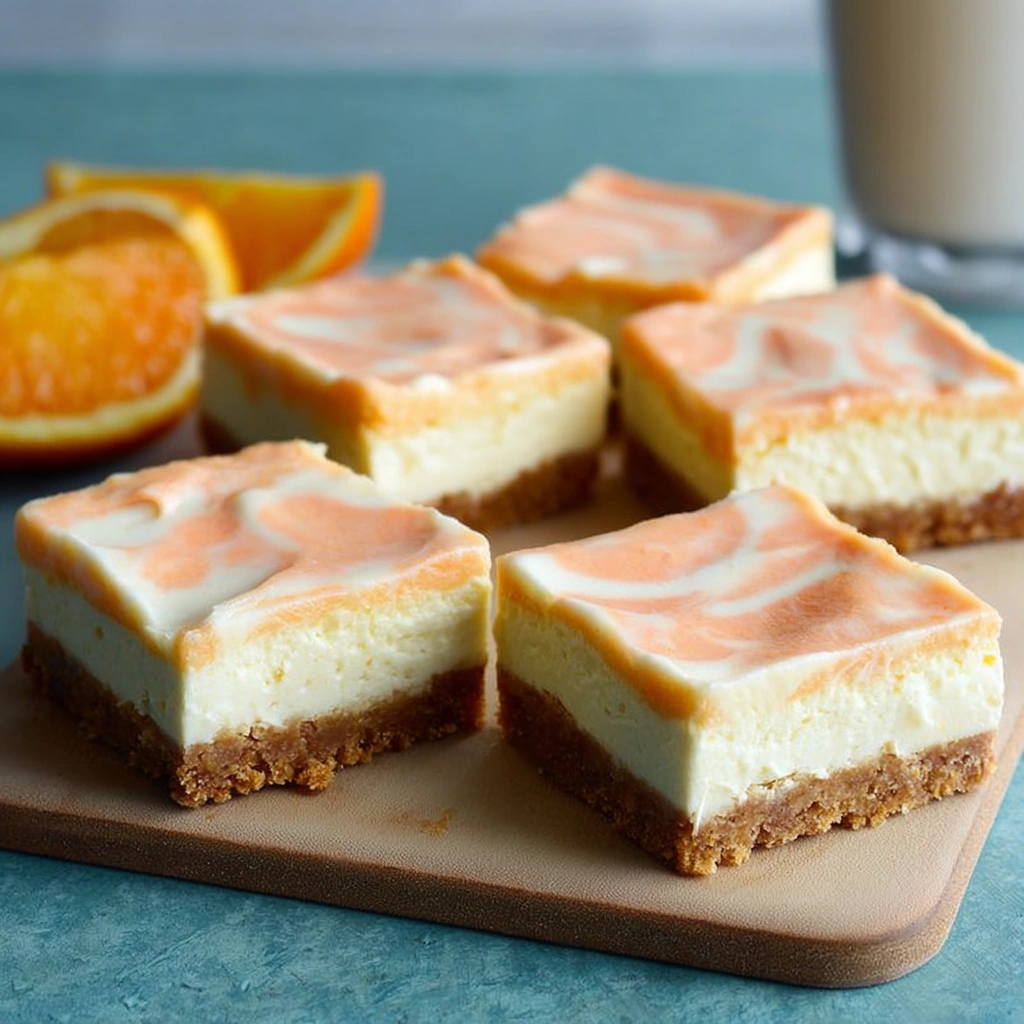
No-Bake Orange-Vanilla Cheesecake Bars epitomize indulgence with a refreshing twist. This recipe combines the zesty brightness of oranges with the creamy sweetness of classic cheesecake, resulting in a dessert that is both vibrant and satisfying. The creamy texture pairs beautifully with the crunchy graham cracker crust, making each bite a perfect balance of flavors and sensations.
What You’ll Need for No-Bake Orange-Vanilla Cheesecake Bars
Complete Ingredients List
- 16 graham crackers
- 2 Tbsp. granulated sugar
- 1 stick salted butter, melted
- 3 (8-ounce) packages cream cheese, at room temperature
- 1 1/2 cups powdered sugar
- 1 1/2 cups heavy cream
- 2 tsp. grated orange zest
- 1 Tbsp. fresh orange juice
- 1/2 tsp. orange extract
- 1 drop each of red and yellow food coloring
- 1/2 tsp. vanilla extract
Ingredient Substitutions & Alternatives
If you have dietary restrictions or preferences, there are several substitutions you can consider for the No-Bake Orange-Vanilla Cheesecake Bars:
- Gluten-free: Use gluten-free graham crackers or alternative crusts like almond flour or gluten-free cookies.
- Dairy-free: Substitute cream cheese with a dairy-free cream cheese alternative and use coconut cream in place of heavy cream.
- Sugar-free: Replace powdered sugar with a sugar substitute like erythritol or stevia, adjusting to taste.
- Flavor variations: For a twist, swap orange for lemon or lime zest, or try using other flavored extracts like almond or coconut to create a different profile.
How to Make No-Bake Orange-Vanilla Cheesecake Bars
Creating these scrumptious No-Bake Orange-Vanilla Cheesecake Bars is an enjoyable process that will surely impress your family and friends. Follow these detailed instructions for a flawless dessert:
Step 1: Prepare the Crust
Start by lining a 9-by-13-inch baking dish with parchment paper, ensuring you leave enough overhang on the sides for easy removal later. Next, take the graham crackers and granulated sugar and place them in a food processor. Pulse the mixture until it reaches a fine, crumbly texture. While the motor of the food processor is running, slowly pour in the melted butter until the mixture resembles coarse sand. Transfer the buttery crumbs into the lined baking dish and use a measuring cup to firmly press the crumbs into an even layer at the bottom of the pan. For a perfect crust, chill it in the freezer for about 20 minutes, allowing it to set firm.
Step 2: Make the Cheesecake Filling
In a stand mixer fitted with a paddle attachment, beat the cream cheese at room temperature until it becomes smooth and creamy. Scrape down the sides of the bowl, then add the powdered sugar gradually, mixing well until the combination is silky and fully combined. Transfer this creamy mixture to a large mixing bowl, setting it aside momentarily.
Step 3: Whip the Heavy Cream
In the same stand mixer bowl (no need to clean it), pour the heavy cream. Beat on medium-high speed using the whisk attachment until stiff peaks form, which usually takes about 3 to 4 minutes. Once the heavy cream is whipped to perfection, gently fold one-third of it into the cream cheese mixture using a rubber spatula. This will help lighten the cheesecake filling. Continue to slowly add the remaining whipped cream, folding carefully until everything is uniformly mixed.
Step 4: Divide and Flavor the Mixtures
Once the filling is smooth, separate half of the cheesecake mixture into another bowl. In the bowl with the larger amount of cheesecake filling, add the grated orange zest, fresh orange juice, orange extract, and both drops of red and yellow food coloring. Gently stir until just combined to achieve a lovely hue. In the other half, simply add the vanilla extract and stir to combine.
Step 5: Assemble the Bars
Now it’s time to layer the cheesecake! First, take the crust out of the freezer and pour the vanilla cheesecake batter on top of the chilled graham cracker base, spreading it evenly. Next, gently add the orange cheesecake filling on top, smoothing it out carefully. Use a toothpick or skewer to create a marbled effect by swirling the two mixtures together. Cover the baking dish with plastic wrap and refrigerate until the bars are fully set, which should take at least 6 hours or can even be left overnight for convenience. After setting, loosen the cheesecake from the pan and cut it into squares for serving.
🍴 Top Kitchen Essentials You’ll Love




Serving Suggestions for No-Bake Orange-Vanilla Cheesecake Bars
How to Serve No-Bake Orange-Vanilla Cheesecake Bars
These cheesecake bars taste best when served chilled. It’s recommended to let them sit at room temperature for a few minutes before slicing to ensure easier cutting. To plate, opt for square or rectangular pieces that showcase the beautiful orange and vanilla layers. You can use the parchment overhang to lift the cheesecake from the dish, slice it into squares, and arrange the pieces artistically on a serving platter or dessert plates.
Perfect Pairings & Toppings
To elevate your No-Bake Orange-Vanilla Cheesecake Bars, consider pairing them with complementary toppings such as a swirl of whipped cream, fresh orange slices or segments, and a drizzle of chocolate or caramel sauce for a decadent touch. Additionally, a dusting of powdered sugar will give them a beautiful finish. For a crunchier texture, sprinkle some crushed nuts or toasty coconut flakes on top.
Storing & Preserving No-Bake Orange-Vanilla Cheesecake Bars
Best Storage Methods
To keep your No-Bake Orange-Vanilla Cheesecake Bars fresh, store them in an airtight container in the refrigerator. They can be kept for up to 5 days. If you’d like to store them for a longer period, consider freezing them. Wrap individual squares tightly in plastic wrap, then place them in a freezer-safe container or a resealable bag. They can be frozen for up to 2 months.
Reheating or Freezing Tips
If you freeze the cheesecake bars, no need to confuse them with cakes that require reheating. Instead, let the squares thaw in the refrigerator overnight before serving. This method ensures they maintain their creamy texture without becoming soggy. If you’re in a hurry, you can leave them at room temperature for about 30 minutes to an hour, but ensure they don’t sit out too long, especially in warm weather.
Tips for Perfect No-Bake Orange-Vanilla Cheesecake Bars Every Time
Avoid These Common Mistakes
Creating the perfect No-Bake Orange-Vanilla Cheesecake Bars requires attention to detail. Avoid overwhipping the heavy cream as this can lead to a grainy texture. When mixing, ensure you fold the whipped cream gently to maintain its airy lightness, rather than stirring vigorously, which would deflate the mixture.
Helpful Tricks for Success
Using room temperature cream cheese is crucial for a smooth filling – straight from the fridge can lead to lumps. For an even speedier preparation, consider using a food processor for both the crust and the filling, which minimizes cleanup. If you want to achieve beautiful layers, experiment with the amount of food coloring used but remember, less is more for a natural appearance.
Fun Variations of No-Bake Orange-Vanilla Cheesecake Bars
Flavor Variations or Recipe Twists
There are numerous fun variations to the No-Bake Orange-Vanilla Cheesecake Bars recipe. If you’re a chocolate lover, create a chocolate swirl by adding cocoa powder to one half of the cream cheese mixture. For a fruity twist, incorporate pureed berries or mango into the filling, which adds a delightful layer of flavor and a pop of color.
Dietary-Friendly Adjustments
For those seeking a vegan version, substitute the cream cheese with a plant-based alternative, utilize coconut cream, and use a vegan cookie for the crust. If you’re looking to create a keto-friendly version, explore alternatives like almond flour for the crust or sugar-free sweeteners. You can swap the powdered sugar for a keto-approved blend and ensure that all ingredients adhere to your dietary preferences.
FAQs
What If My No-Bake Orange-Vanilla Cheesecake Bars Don’t Turn Out Right?
If your cheesecake bars don’t set properly, it could be due to not enough chilling time or incorrect ingredient ratios. Ensure that you’ve accurately measured your ingredients, especially the heavy cream and sugar. If they seem too dry, it could mean they were overwhipped or had insufficient moisture. A quick fix for texture concerns is to serve them with a drizzle of sauce, creating added moisture and flavor.
Can I Prepare This in Advance?
Absolutely! In fact, one of the benefits of these cheesecake bars is that they can be made a day ahead of time, allowing the flavors to meld beautifully. Store them in the refrigerator tightly wrapped or in an airtight container until you’re ready to serve. Just be sure to let them set adequately – allowing at least 6 hours in the refrigerator is key to a satisfying firmness.
What Ingredients Can I Swap?
Common swaps include using dairy-free alternatives like cashew cream in place of cream cheese or coconut whipped cream for heavy whipping cream. If you’re unable to find graham crackers, feel free to use your favorite cookie for the crust, as long as it adheres well when crushed and mixed with butter. For a healthier option, try oat flour or nut flour to create a fresh twist on the crust base.
In conclusion, No-Bake Orange-Vanilla Cheesecake Bars are more than just a dessert; they are a culinary experience that brings together fun colors, refreshing flavors, and creamy textures. With your newfound understanding of how to make these bars, incorporating personal twists, and finding the best serving methods, your gatherings will certainly be elevated to a new level of culinary delight. Embrace your creativity in the kitchen, and enjoy sharing this delightful treat with loved ones!
Print
No-Bake Orange-Vanilla Cheesecake Bars
- Total Time: 4 hours 30 minutes (including chilling)
- Yield: 16 bars 1x
- Diet: Vegetarian
Description
These No-Bake Orange-Vanilla Cheesecake Bars are a refreshing and creamy layered dessert with a buttery graham cracker crust, infused with citrusy orange zest and vanilla. Perfect for warm days and easy to prepare without turning on the oven.
Ingredients
- 16 graham crackers
- 2 Tbsp. granulated sugar
- 1 stick salted butter, melted
- 3 (8-ounce) packages cream cheese, at room temperature
- 1 1/2 cups powdered sugar
- 1 1/2 cups heavy cream
- 2 tsp. grated orange zest
- 1 Tbsp. fresh orange juice
- 1/2 tsp. orange extract
- 1 drop red food coloring
- 1 drop yellow food coloring
- 1/2 tsp. vanilla extract
Instructions
- Line a 9-by-13-inch baking dish with parchment paper, leaving overhang on the sides for easy removal.
- In a food processor, pulse graham crackers and granulated sugar until fine. While running, slowly add melted butter until the mixture resembles wet sand.
- Press the mixture firmly into the prepared pan to form an even crust layer. Freeze for 20 minutes to set.
- In a stand mixer with paddle attachment, beat the cream cheese until smooth. Gradually add powdered sugar and continue mixing until fully incorporated.
- In the same mixer bowl (switch to whisk attachment), beat heavy cream on medium-high speed until stiff peaks form, about 3–4 minutes.
- Fold one-third of the whipped cream into the cream cheese mixture to lighten it, then gently fold in the rest until fully combined.
- Divide the cheesecake filling into two bowls. In one bowl, mix in orange zest, orange juice, orange extract, and food coloring to create the orange layer. In the other bowl, add vanilla extract for the vanilla layer.
- Spread the vanilla mixture evenly over the chilled graham cracker crust. Top with the orange mixture, smoothing it gently with a spatula. Use a toothpick to swirl the layers, if desired.
- Chill the bars in the refrigerator for at least 4 hours, or until fully set. Slice and serve cold.
🍴 Top Kitchen Essentials You’ll Love
Notes
- For best results, chill overnight for maximum firmness.
- Use a hot knife to slice clean bars.
- Add extra orange zest on top for a decorative touch.
- Store leftovers in an airtight container in the fridge for up to 5 days.
- Prep Time: 30 minutes
- Cook Time: 0 minutes
- Category: Dessert
- Method: No-Bake
- Cuisine: American
Nutrition
- Serving Size: 1 bar
- Calories: 310
- Sugar: 20g
- Sodium: 180mg
- Fat: 24g
- Saturated Fat: 14g
- Unsaturated Fat: 8g
- Trans Fat: 0g
- Carbohydrates: 22g
- Fiber: 0g
- Protein: 4g
- Cholesterol: 70mg
Keywords: no-bake cheesecake bars, orange vanilla dessert, citrus cheesecake, layered cheesecake, summer desserts